接触过计算机网络一定对Wireshark这个软件十分熟悉,它是一个跨平台强大的抓包工具,其中核心库就是使用了libpcap,进行抓包解析,最近有一些使用 libcap 的经历,这里进行简单的记录。
使用环境
- Ubuntu 17.10
- GCC 7.2
- libcap
网络设备
在使用 libcap 进行抓包或者发包时,首先必须要指定一个设备进行操作,所谓设备我们在打开 wireshark 时要选择的就是一个设备:

在我这里从上之下依次是无线网卡,有线网卡,任意(选择表示抓任意网卡的包),回环地址(用于抓本地请求,如在本地 web 搭建服务器调试时),还有蓝牙设备。
或者执行ifconfig展示出的也是可用设备以及其部分网络信息:

在使用 libcap 时,在头文件中引入pcap.h后,其定义的设备的数据结构为pcap_if_t:
struct pcap_if {
	struct pcap_if *next;
	char *name;		    /* name to hand to "pcap_open_live()" */
	char *description;	/* textual description of interface, or NULL */
	struct pcap_addr *addresses;
	bpf_u_int32 flags;	/* PCAP_IF_ interface flags */
};
可以使用函数pcap_findalldevs得到本机上所有可用网卡,返回的是一个指向设备数据结构的指针,所有设备以单向链表的形式储存着,因此可以向后遍历列出所有设备,我这里就默认选择第一个可用设备:
pcap_if_t *get_default_dev()
{
    char pcap_errbuf[PCAP_ERRBUF_SIZE];
    pcap_if_t *devices, *dev;
    if (pcap_findalldevs(&devices, pcap_errbuf) != 0) {
        fprintf(stderr, "Failed to find any device: %s\n", pcap_errbuf);
        exit(0);
    }
    dev = devices;
    return dev;
}
发送一个简单的 ARP 请求报文
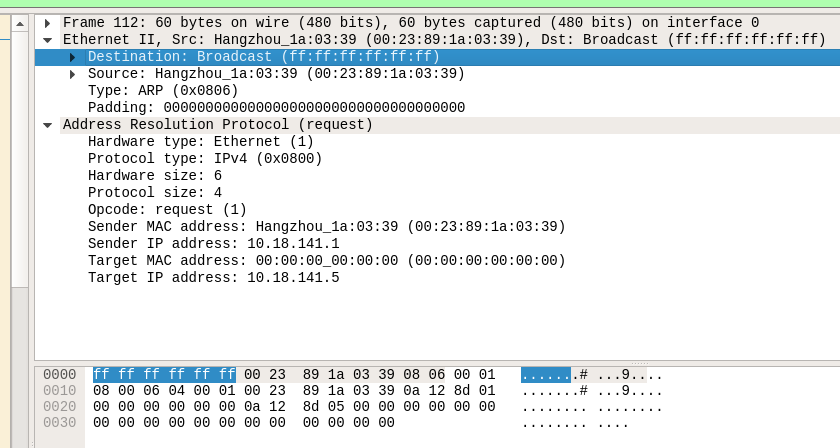
ARP 是一个链路层网络协议,其目的时得到拥有指定 IP 地址的设备接口的 mac 地址,在打开 wireshark 输入 arp 进行过滤可以看到设备所在网关会重复发送 ARP 广播以随时获取接入其所有网络设备的正确接口物理地址,以进行正确的路由。

构造以太帧头部
在系统头文件<ethernet.h>中定义以太帧头部数据结构为:
struct ether_header
{
  uint8_t  ether_dhost[ETH_ALEN];	/* destination eth addr	*/
  uint8_t  ether_shost[ETH_ALEN];	/* source ether addr	*/
  uint16_t ether_type;		        /* packet type ID field	*/
};
- 目的 mac 地址,这里正是为了得到某 IP 的物理地址,因此需要在整个网络中寻找,因此发送的目的地址为广播地址:
ff:ff:ff:ff:ff:ff - 源 mac 地址,本机的 mac 地址
- 以太帧类型,使用
htons(ETH_P_ARP)将在头文件中宏定义的 ARP 类型0x0806存入结构体中
构造 ARP 请求
在头文件<if_ether.h>中定义了 ARP 请求的结构体:
struct	ether_arp {
	struct	arphdr ea_hdr;		/* fixed-size header */
	uint8_t arp_sha[ETH_ALEN];	/* sender hardware address */
	uint8_t arp_spa[4];		    /* sender protocol address */
	uint8_t arp_tha[ETH_ALEN];	/* target hardware address */
	uint8_t arp_tpa[4];		    /* target protocol address */
};
使用 pcap 发包
对相应的网络接口打开一个 PCAP 实例:
char pcap_errbuf[PCAP_ERRBUF_SIZE];
pcap_errbuf[0] = '\0';
pcap_t *pcap = pcap_open_live(if_name, BUFSIZ, 1, 1000, pcap_errbuf);
if (pcap_errbuf[0] != '\0') {
    fprintf(stderr, "%s\n", pcap_errbuf);
}
if (!pcap) {
    exit(1);
}
将填充好的整个请求帧(frame)写入接口完成发包:
pcap_inject(pcap, frame, sizeof(frame))
关闭接口:
pcap_close(pcap);
使用 libpcap 进行抓包
进行抓包时一般进行这几个步骤:
- 指定网络设备
- 打开设备准备抓包
- 编译过滤表达式
- 为 pcap 实例设置编译后的过滤表达式
- 开启循环抓包
- 关闭 pcap 实例停止抓包
void capture()
{
    char errbuf[PCAP_ERRBUF_SIZE] = {'\0'};
    pcap_if_t *dev;
    struct bpf_program fp;
    char filter_exp[] = "(icmp or arp) and ether src 9c:b6:d0:d3:b8:5d";

    //直接获取默认设备
    dev = get_default_dev();
    fprintf(stdout, "Capturing packet using default device: %s\n\n", dev->name);

    //pcap_open_live:打开一个设备准备抓包
    //参数:0-设备名 1-捕获字节数 2-开启混杂模式 3-连接超时时间 4-错误输出缓冲
    pcap_t *pcap = pcap_open_live(dev->name, BUFSIZ, 1, 1000, errbuf);
    if (!pcap) {
        fprintf(stderr, "Couldn't open device %s: %s\n", dev->name, errbuf);
        exit(0);
    }
    //pcap_compile:将过滤表达式编译打包成可用的过滤程序,并输出到fp
    //参数:0-pcap实例,1-保存pcap过滤程序的结构体指针,2-过滤表达式字符串,3-是否优化,4-掩码,若不进行广播操作可设置为未知
    if (pcap_compile(pcap, &fp, filter_exp, 0, PCAP_NETMASK_UNKNOWN) == -1) {
        fprintf(stderr, "Couldn't parse filter %s: %s\n", filter_exp, pcap_geterr(pcap));
        exit(0);
    }
    //pcap_setfilter:为pcap实例设置一个编译好的过滤程序
    //参数:0-pcap实例,1-保存pcap过滤程序的结构体指针
    if (pcap_setfilter(pcap, &fp) == -1) {
        fprintf(stderr, "Couldn't install filter %s: %s\n", filter_exp, pcap_geterr(pcap));
        exit(0);
    }

    //循环抓取10个包,got_packet为回调函数,printer为解析包进行可读输出的一个回调,这里不进行展开
    pcap_loop(pcap, 10, printer, NULL);

    //关闭pcap停止抓包并退出
    pcap_freecode(&fp);
    pcap_close(pcap);
}